Pikaswaps: Guide to Swapping Subjects in Videos

Pika has been consistently adding new features to its platform, and once again, they’ve come up with something exciting. Previously, Pika introduced Pika Scenes, which allows you to take multiple images and turn them into a video. You could take an image of a background, a subject, and an object, and then combine them together to form a dynamic scene.
Later, Pika rolled out another feature called Pikadditions, which we explored earlier this month. Using Pikadditions, I created a video model walking down the street with my turtle friend.
In this guide, we’ll explore Pika’s newest update — Pikaswaps. This feature lets you swap out subjects within a video, opening up a wide range of creative opportunities. Let’s go step by step to understand how to use it effectively.
What is Pika Swaps?
Pika Swaps is a tool within the Pika platform that enables users to swap subjects or objects within a video. With this feature, you can:
- Replace an object or character in a video with a different one.
- Modify what a person is wearing, similar to a virtual try-on experience.
- Make creative changes to scenes while keeping the video flow intact.
You can either describe what you want to swap using text prompts or use a brush tool to highlight the specific area you want to modify. The brush method provides precision, while the text description offers flexibility.
What Pikaswaps Does?
Pikaswaps allows you to replace any subject in a video with something else.
- You can swap out characters, like replacing a turtle in a video with an eagle.
- You can change outfits, similar to the Virtual Try-On feature in other tools like Kling.
- You can even customize objects, like replacing a dress with armor or a sword.
This feature is especially powerful for short, five-second videos where you want to make impactful changes.
Pika Swaps Overview
| Feature | Description |
|---|---|
| Purpose | Swap out subjects or objects within a video. |
| Input Type | Video files (around 5 seconds long recommended). |
| Modification Methods | Use text descriptions or the brush tool to define changes. |
| Example Uses | Change clothing, swap characters, or replace objects. |
| Output Quality | Depends on clarity of the prompt and accuracy of brush selection. |
| Best Practice | Start with simple swaps for the most accurate results. |
Step 1: Preparing Your Media
Before using Pikaswaps, you need:
- A video clip, preferably around 5 seconds long.
- A replacement image or subject that you want to swap into the video.
I decided to start with a video I had previously created using Pikadditions, which featured a model walking down the street with a turtle.
Here’s what I gathered:
- Original video – Model walking down the street with a turtle friend.
- Replacement assets – An eagle image and a dinosaur image for later experiments.
Step 2: Collecting Assets from Other Platforms
Sometimes you might need to source images from other platforms. Here’s what I did:
- I visited Kling to download short, watermark-free video clips.
- Then, I headed over to MidJourney to find high-quality images, like an eagle, that I wanted to swap into my video.
Pro Tip: Make sure the images and videos are clear and distinct to get the best results during swapping.
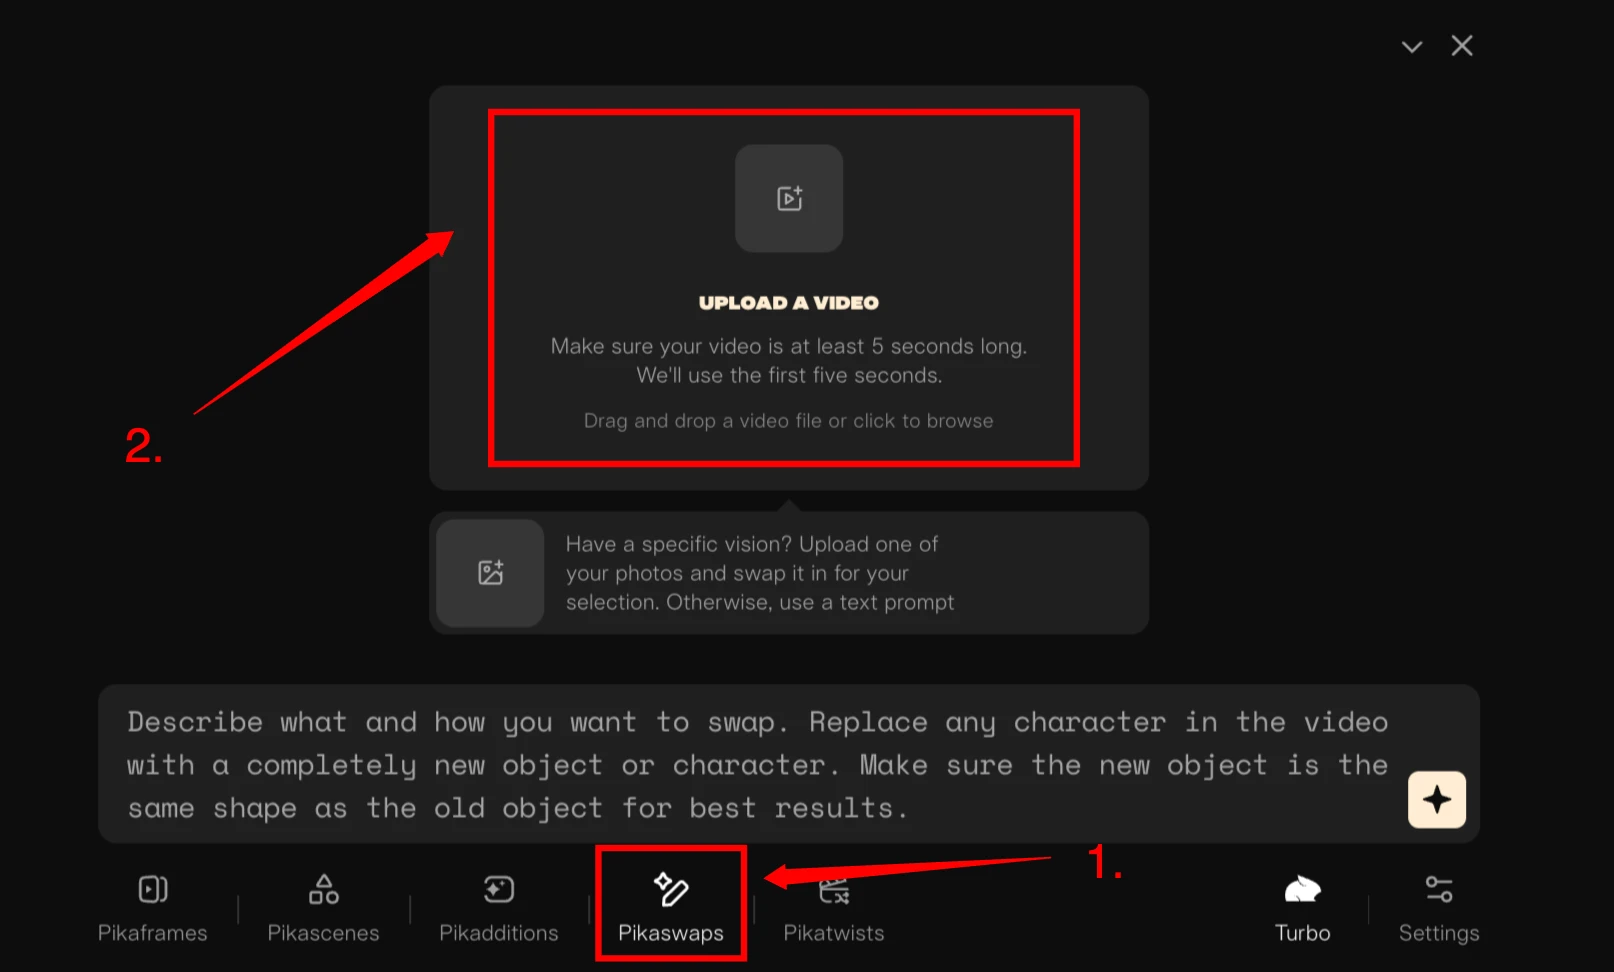
Step 3: Uploading to Pikaswaps
Once I had everything ready, it was time to use Pikaswaps.
- Open Pikaswaps on the Pika platform.
- Upload the original video where you want to make changes.
- In my case, I uploaded the video of the model walking with the turtle.
- Identify what you want to swap.
- For the first test, I wanted to replace the turtle with an eagle.
- Upload the replacement image (the eagle in this case).
Step 4: Using the Brush Tool
Pikaswaps gives you two options to specify what you want to modify:
- Brush Tool – Manually highlight the area you want to replace.
I prefer the Brush Tool because it’s more precise.
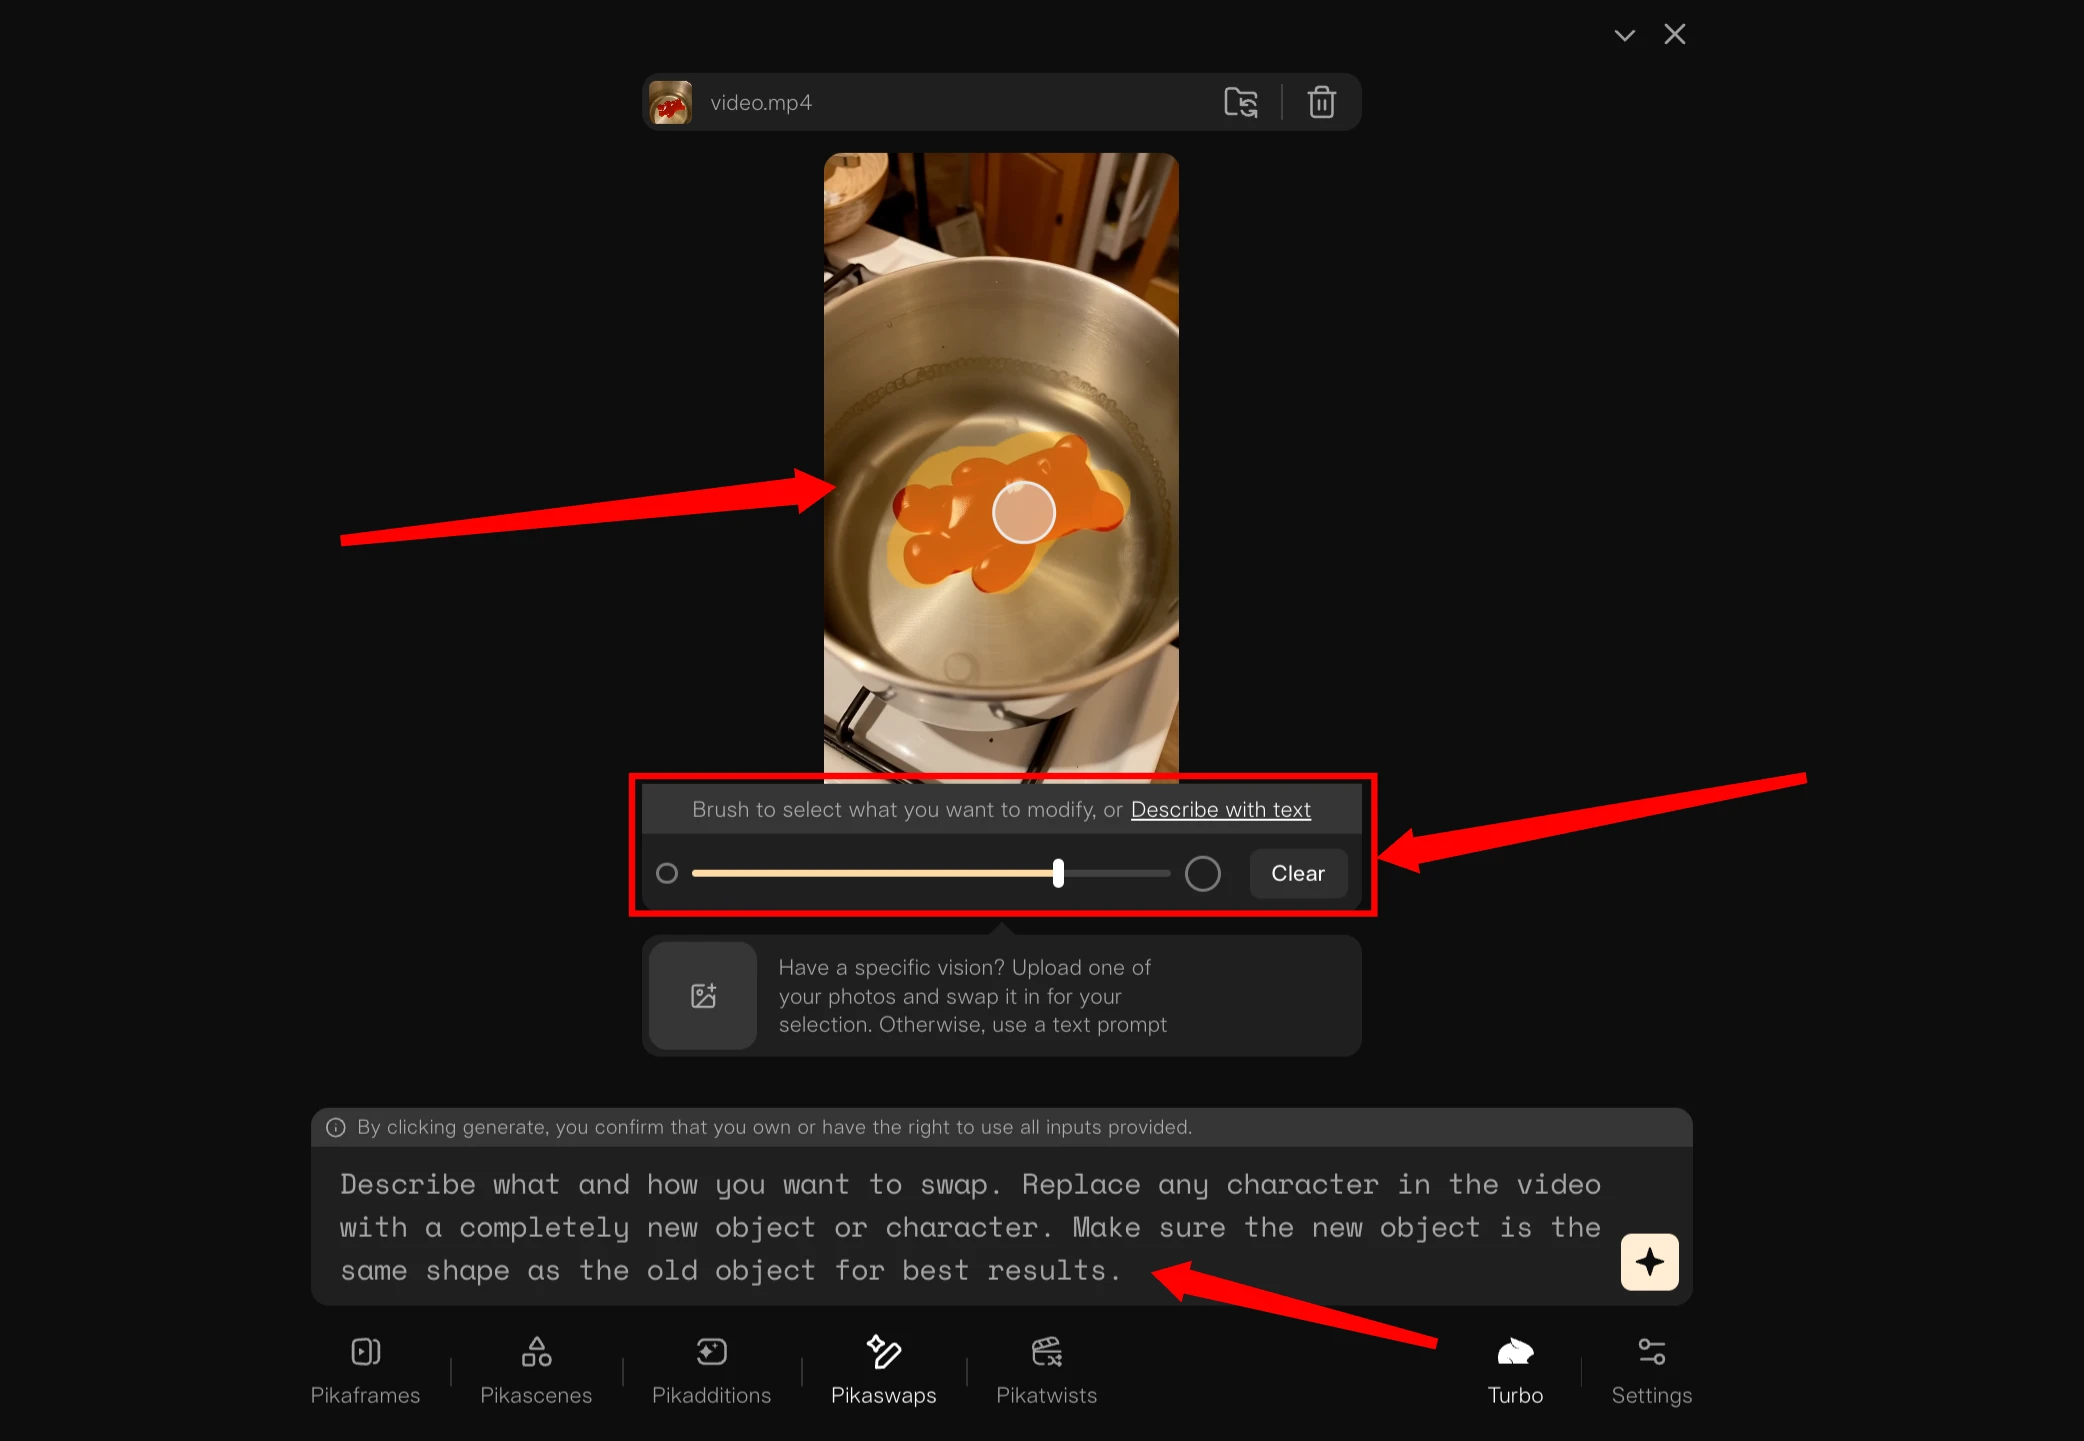
- I selected the turtle in the video by carefully painting over it with the brush.
- Then, I told the system to swap the “turtle creature” with the “eagle.”
Step 5: Running the Swap
After marking the area:
- Choose the Turbo mode, as Pikaswaps currently requires it for processing.
- Confirm the swap and let the AI process your request.
The first result wasn’t perfect — the wings of the eagle didn’t blend well, and the final output looked a bit off. This showed me how important it is to highlight carefully and be clear in your instructions.
Step 6: Trying a Simpler Example
To test further, I uploaded a new image — a dinosaur. Here’s what I did:
- Uploaded the dinosaur as the main subject.
- Highlighted the object I wanted to replace using the brush.
- Didn’t provide any extra instructions, just clicked “Do it.”
This time, the swap worked much better.
- The dinosaur was clearly swapped into the scene.
- Since there were no complex background elements, the result was cleaner and more realistic.
Step 7: Swapping Outfits
Pikaswaps isn’t just for swapping characters — you can also replace clothing or accessories.
For my next experiment:
- I used the same video of the model walking down the street.
- Highlighted her dress with the brush tool.
- Added the following instruction:
Swap dress for armor and sword- Uploaded an image of armor and a sword.
The result was impressive.
- The model’s dress was replaced with armor, and she now held a sword.
- While the hands weren’t perfectly rendered, the overall transformation looked great.
Comparing Results: Three Experiments
| Experiment | Original Subject | Replacement | Result Quality |
|---|---|---|---|
| First Test | Turtle | Eagle | Poor – Blurry wings, mismatched blending |
| Second Test | Object in Still Image | Dinosaur | Good – Clean swap, clear subject |
| Third Test | Dress | Armor & Sword | Very Good – Minor issues with hands |
Key Features of Pika Swaps
Here are the key features that make Pika Swaps an essential tool for creative video editing:
- Subject Replacement
Easily replace characters or objects in your videos with new ones. - Brush Tool for Precision
Highlight exactly what you want to change, ensuring the AI knows where to apply modifications. - Text Description Support
Alternatively, you can describe the swap you want to make using natural language. - Creative Control
Swap clothing, accessories, or even entire characters to create customized scenes. - Compatible Video Length
Works best with videos that are approximately five seconds long. - Simple and Complex Swaps
Start with basic swaps, then experiment with more complex edits as you gain experience.
Tips for Best Results
Here are a few things I learned while experimenting with Pikaswaps:
- Start Simple
- The simpler the request, the better the output.
- Complicated changes like replacing multiple moving objects can be tricky.
- Use the Brush Tool Carefully
- Precise highlighting is essential for accurate swaps.
- Avoid selecting extra parts of the background.
- Keep Videos Short
- Stick to around 5 seconds for smoother processing.
- Clear Prompts Matter
- If using the description box, be specific about what you want swapped.
- Experiment and Adjust
- If the first attempt isn’t perfect, tweak the brush area or wording and try again.
FAQs about Pika Swaps
Q1. What type of videos work best with Pika Swaps?
Videos around 5 seconds long tend to work best for accurate swaps and smooth processing.
Q2. Can I swap clothing in a video?
Yes, you can swap clothing or accessories, similar to a virtual try-on feature.
Q3. Which is better: the brush method or text description?
The brush method is usually more precise, while text descriptions are better for general or complex swaps.
Q4. What if the swap doesn’t look accurate?
Try these steps:
- Simplify your request.
- Refine the brush selection.
- Use a clearer prompt.
- Keep the video shorter for better accuracy.
Q5. Can I swap multiple objects at once?
Yes, but start with one object at a time for the most reliable results.
Final Thoughts
Pikaswaps is a powerful feature for creative video editing. It takes the concept of outfit changes and subject swaps to a whole new level.
- In my tests, simpler swaps worked best, such as replacing a single object or changing clothing.
- Complex scenes, like swapping an eagle for a moving turtle, required more precision and didn’t always give perfect results.
Still, the potential of Pikaswaps is clear. It’s a valuable addition to Pika’s growing suite of tools, especially for creators who want to customize short videos in unique ways.
By combining Pikaswaps with Pika Scenes and Pikadditions, you can create dynamic, customized content that stands out.
Related Guides
- Create transitions with Pikaframes.
- Explore effects in Pika Effects.
- Insert objects into videos with Pikadditions.
- Compare model results in Pika Art 2.2.
- See previous model info in Pika 1.
- Browse all tools in Pika Labs.